Creating Graphics for Facebook Timeline Events
UPDATE:: February 21, 2013 – Facebook has rolled out a new layout for events with a totally different size and shape for the graphic. Get the template for the new banner image.
UPDATE: December 26, 2012 – A new version of the template is now available with updated guides. (v1.5)
One of the things I am doing every week is design event flyers for my friend Danny Vegas and promote his events through his Facebook page, group and through his website. Along the way I’ve developed my own way of doing things and it’s time to share what I’ve learned.
For every event I am creating three different images and they (or parts of them) will be shown in eight different places at least! To promote an event on Facebook it takes at least 3 different images as far as i can tell:
– One for the Event page,
– one for the Timeline cover photo and
– a traditional event flyer.
Factor in a custom image for the website (which has its own requirements) and one event could mean creating 4 or maybe even 5 images, all in different sizes and dimensions!
I’m only covering one right now; I’ll talk about flyers in my next post.
Event Profile Image Size – 180 x 540px
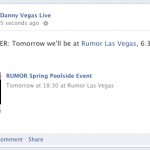
 This image used in two places; three if you count the newsfeed when you share the event. I never share the event straight from the event page though, since the image is very small and there’s no description (see example). This is why I create flyers for the events and add the URL & a full description of the event to the image itself… but I’ll get to that later.
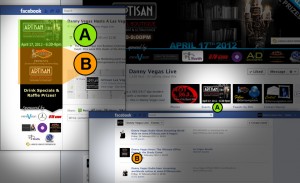
To use the maximum amount of space Facebook allows, I create a profile image that is 180px wide by 540px high. I’m not sure why exactly, but since the image is so tall, Facebook pulls different parts of the image when displaying it on the Timeline and on the event listing page. See what I mean in the image below.
 A) Events App preview image. The App preview images are 111px wide by 74px tall; so first my image gets resized, and second – Facebook only shows the very top of my image. For this reason I make sure the top of my image includes the logo for the location as well as the time and date.
- B) Facebook uses a square section of the profile image as a thumbnail preview for each event. This is why I include a larger version of the logo for the venue a second time as well as the logo for the event host.
The rest of the image is wide open to be used for things like sponsor logos, badges or anything else you can fit in there. I found that people don’t really read that much, so it helps if to visualize the information instead. Think Pinterest ;)
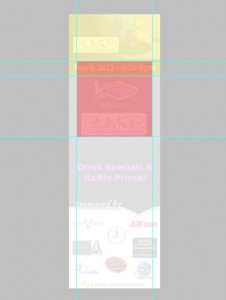
 Keeping up with Facebook’s changes could be a full-time job! I’ve modified my template to reflect the changes. If you like, you can download my Photoshop template to create your own event profile images.
I know there are a lot of events on Facebook — have you seen anyone doing things differently or even better? If there are any other ways of doing this I would love to hear about them!
21 Responses to “Creating Graphics for Facebook Timeline Events”
Leave a Comment
1 Trackback
- New Event Banner for Facebook Events » FAQs & Blog | InlineVision: Web Design / E-Commerce / PPC / Social Media | Las Vegas, NV
[…] a simple banner so why create another template? For the same reasons I created the first template… because Facebook only shows a small portion of the event image on your Facebook page in the […]


This… is AWESOME! Thank you so much. The advice alone is a huge help, but the template will come in very handy. Much appreciated for our little nonprofit! :)
Happy I could help! :)
Thanks for doing the leg-work on that. Made quick work of creating my event graphic
First off, thank you for these instructions — very useful.
Question: In the template, do the guides represent the new FB requirements? What is the orange section (the one where you have time & date)?
Thanks!
Is the template still active? I tried downloading it and never got an emailed link.
Hi Benjamin,
it absolutely is!
Please check your spam/junk folder(s) for an email from support@inlinevision.com
Nina
Great post, thanks. Never got the template either, not in spam.
Not sure what happened there but I just sent you my newest version of the template with slight changes to the guides to reflect Facebook’s current settings.
I’ve been waiting for delivery of the new template too, not in spam, tried a couple of email addresses… please fwd a copy, thanks.
Hi Adam,
sorry for the inconvenience – could you please try again? I will monitor the backend to identify potential issues.
Thanks!
For anyone following the comments on this post, there is a new version of the template available. I made some adjustments to the guides to match Facebook’s current settings.
http://inlinevision.com/blog/creating-graphics-for-facebook-timeline-events/
Can you give some advice on image quality?
I use a 2 color image for the 180×540 image and facebook turns the quality so low that it blurres the image. It seems FB turns jpg quality down to 30%.
Any ideas how to make this look sharp?
Hi Mihkel,
I do see some degradation of my images when uploading them to Facebook but not to the level you’re experiencing. Can you share a link to one of your events so I can see what’s going on?
Facebook did start allowing us to upload PNG files for cover photos and profile images a little while ago. I just checked and you can also upload PNG files for events as well. You could try uploading a PNG file and see if that helps.
Let me know how it goes.
can’t get the template…have tried multiple times :/
Sarah,
you have to use a real email address, as the download links gets sent there.
The email comes from support@inlinevision.com – please add the email to your list of allowed email addresses and check your spam/junk folder.
i did use a real email address, and i’ve received no such email. not in spam/junk folder either, so…idk.
Sarah,
can you do me a favor and try again? I will monitor the submissions and watch for your email (if you’re using the same one).
Can get the template either… tried a bunch of times with different email address and it’s not working… and it’s no in the junk folder.
[…] a simple banner so why create another template? For the same reasons I created the first template… because Facebook only shows a small portion of the event image on your Facebook page in the […]
New update to 714x264px. Template please :)
Hi Karl. I have a new template but I’m not getting consistent results yet. Facebook seems to still be working out a few bugs.
You can see my test event here: https://www.facebook.com/events/433291413412887/
Great idea! Works amazingly!